Sunday 28 July 2013

XS650 Wiring and Cables

So...

Made up throttle cables and the clutch cable yesterday.
Was hoping a set of TDM850 throttle cables would fit, but they came up about 1" short.
So we made up a custom throttle cable.

Clutch cable was also custom.

Anyways that sucks as I was hoping the majority of the future replacement parts could be sourced from the Yamaha dealer, but whatever.


Here is the business end of the new throttle cable.See behind, had to cut off the "Y" spigot from the breather as it interfered with cable routing. Tapped it 1/2 NPT, l have to come up with a breather solution at some point. Ignore the phillips screws on the valve cover, waiting for the studs to show up, then we'll use the proper set up.

Thottle tube end, it all works smooth and is fully adjustable like stock.

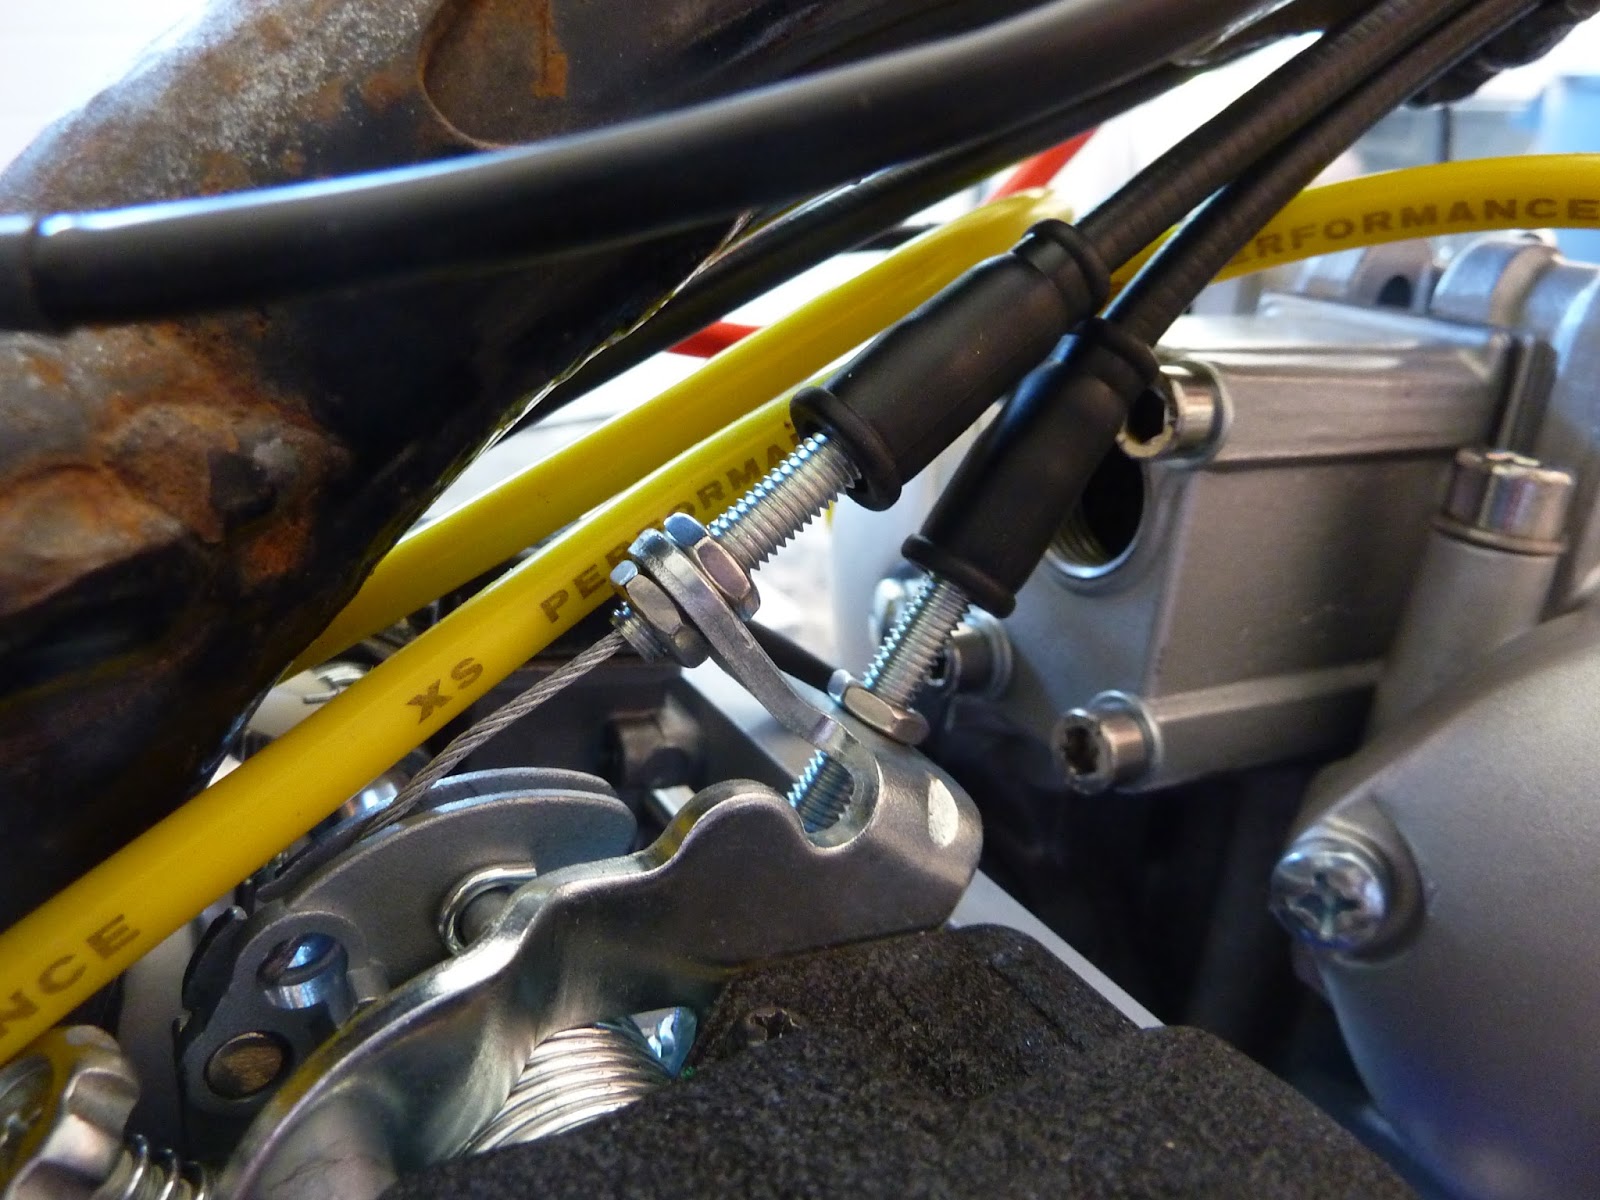
Clutch perch end, Clutch is pretty heavy with the aftermarket springs. Might consider a hydraulic conversion at some point in the future, but for now I'll just have to develop some forearm muscle..


Under seat layout of regulator, fuse box, battery, latching relay, RFID receiver and transmitter and the coils. I'll have to make up the seat/electrical pan next week. Thinking I will weld in mounting tabs and make the pan from aluminum. If I do this correctly I can mount the tray in rubber grommets and isolate most of the vibration away from the electrical.

Not 100% behind the RFID ignition yet. I do like it, it's cool not to have keys rattling around. I wired it temporarily and it worked great. Walk up pass the key fob near the receiver and the ignition connects, gauge and light come on and it's ready to fire. My concern is if the battery is drained for some reason, you won't be able to latch the relay with the RFID signal. So my work to make a system that doesn't need  a battery to run, is kinda worthless. What i might do is put a ignition key under the seat and wire it in parallel with the RFID. Then the RFID can be overridden if need be.


Lots to finish off. Trying to use Molex sealed connectors everywhere. Should be 100% sealed when done.


Coil position... for now.


Gauge mounted. Need the tether beside it for racing.
Gauge is really sweet. Punched a hole in the starter gear cover plate under the sprocket and put the oil temperature thermocouple there. Really happy with the gauge. Had the starter button hooked up for testing to act as the mode button, worked perfect.

The gauge has the following modes:
  • Oil temp
  • Oil temp warning light, (settable)
  • Air temp
  • Volt meter
  • Trip meters
  • Full fuel gauge (have to put a float in the tank)
  • Analog and digital tach
  • Digital speedo
  • Lap timer
  • Odometer
  • Ridng timer
  • Neutral indicator
  • High beam indicator
  • Signal indicator, left and right


Monday 22 July 2013

Finished Pipe, almost.

Here is the finished pipe. Well almost, couple welds to finish, then some Scotchbrite work.

Difficult to figure routing. Be much easier if I didn't have a 10 year old son desperately wanting on the back.
Try to find a "leg happy" spot for the set of passenger pegs required. Think we will still add a carbon heat-shield at the beginning of the muffler.

Anyways, happy with the result, it zigs in to clear my calf and kind of stays true to the look of a dirt tracker.

I'm sure the performance guru's will complain that the primary is too long and the pipe won't flow so good around the frame, but f____ them. This works and if I loose 4-5 HP because of bad pipe tuning, so be it. Can always build a track only system, when I'm out of things to do, or in other words... never.

Anyways, next step is the ton of wiring to go on. Got the ballast and relay for the HID bulb, coils, new teeny weenie ballistic battery, regulator, gauge, sensors, signals, and tail lights. Bought the parts to build a cool little keyless ignition. Got the RFID key fobs, 3" distance receiver and the fancy latching relay. It'll almost be modern.


Have to add exhaust retention springs here to the slip joints before the collector.


Little goofy through the leg area here, but it contours nicely in and away from my calf when its on the peg and my knee is up tight to the tank. Might pre heat the left fuel bowl a little. Compromise... leg or float bowl...


Saturday 20 July 2013

XS650 Pipe

Got a good start on the pipes today.
See if we can get it finished tomorrow.
I'll keep you posted.

Sorry for the low quality images, just my cell phone for a camera.


Sunday 14 July 2013

Engine's in... again.

Wow, the engine keeps getting heavier, harder on my back.
Wasn't certain it would fit with the head on it . Was concerned the new rear engine mount location might interfere, but it goes in.

Once more out and back in after we fit a new pipe and coat the frame.

Which reminds me I weighed it the other day, less the head, pipe, fluids and wiring. It was 305 lbs. I am hoping for well under 350 when all together. Might even be down around 330, that'd be sweet! It also has excellent weight distribution. Should be almost 50/50 when all together. Thinking we might lower the back 1/2 - 3/4". If we can get near the 65hp mark with 330 lbs, I'll be a happy camper!


Might need a chain guard and inner rear fender, that sucks. Lots of small details to work out yet. Hopefully be running in 2-3 weeks, might actually be some summer left.


Kicked it over a couple of times. Not looking forward to getting kicked back by this thing. The 72, has a small lever for decompression on the #1 cylinder. Think I'll put that back on. Maybe just have a plunger knob, beside the choke or something like that. Its a little shaft that rotates down and holds the exhaust valve from closing properly, should work well enough.


Before

Now

Saturday 13 July 2013

Top End on :)

Some progress pictures.

Top nuts are temporary, have to open it up to index the slotted cam to meet the Megacycle specs.
We have the proper brass seal washers and Nyloc nuts for head retention.


Looking down velocity stack to intake valve.

Reshaped exhaust port.

Have to degree the cam, then add ignition parts/covers, then back in the frame for pipe fitting and final bracket making/welding. Will need to add all the brackets for the electrical stuff, coils, regulator, Ballistic battery, fuse panel etc.


Tuesday 9 July 2013

Gauge and general progress.

Found a suitable gauge. Most suitable because its not 1k with the accessories, a la Motgadget.
As much as I like that gauge, just can't do it.

Found a new Acewell gauge I really like.
I will modify it slightly by removing the buttons from the gauge as I want to use the stater button, that no longer has a starter on the other end, as the "mode/scroll" button. I guess I'll see how easily it comes apart first.

Good gauge, has all the idiot lights required. Comes with the pressure and temperature sensors I think. They sell a fuel sender as well, so I can actually have a real fuel gauge. has built in shift light, lap timers, memory for high temp readings , clock, speedo, all the requirements. The back light flashes at settings for low oil pressure or high oil temperature. many adjustable settings and warnings. Packaged in a CNC'd aluminum anodized housing. Overall seems like a fairly competent, well thought out product from the Chinese or Taiwanese more accurately.


Replaced the stupid stock oil hard line today. Mine was all rusted and pitted and beyond salvation. People want $150+ for a new one, so in my typical wisdom, I sent $200 to Russell instead.
Yes it was more than the NOS piece, but I much prefer the look of the braided steel.

New oil line configuration

Oil line fitting.

Tach drive plug from TC Bros... I think that's where it came from.


Here is the latest mock up. Put the engine back in so we can measure up the top rear engine mounts and front engine mounts. Ignore the headlight shell, it's temporary. I have one 1" or 2" smaller than this. We are going to run a HID bulb in there with high and low beam. Should be plenty bright!


Next... The engine is out again to have the top end put on. The beautiful head with its new 7mm valves, 030 cam, 277 Pamco ignition, new mechanical advance unit... amongst all the other new stuff mentioned in prior posts.

After the top end assembly, we'll put it back in to measure for the top engine mounts and to fit the pipe. 

Ended up with a single 4" SuperTrapp for the muffler. I like them because they are fairly retro and are completely tunable depending on ones mood for noise, or lots of noise. Going to go with a 2 into 1 right hand high pipe design... I think. Debating a "proper" left hand mount in my head amongst myselves.


Friday 5 July 2013

Vinyl

Wow that was a pain in the ass! Have to be stupid patient not to make a big clump of wrinkled up vinyl.

Figured I could shorten bike build time by not painting the glass seat.
Bought myself 90 bucks worth of 3M "faux" carbon. It's a little, ok, a lot tacky to use vinyl, but whatever.

Pretty sure I could have made a real carbon fiber seat section in almost the same amount of time!
Got  a friend, Kevin, who makes sled tunnels and other pieces from the stuff. Once you have a mold, it goes pretty quickly. Could have molded it right on the glass. it would have been slightly bigger but would have been fine. Anyways went with the fake stuff.

Thinking about not painting the tank. I so like the bare steel and dents. Maybe a shot of clear, or just scotchbrite and oil every once in awhile??? Could prime paint the tunnel, bottom and rear mount. Oil the top on occasion, just like a good gun :)

Best guess where to start.

Bit of an art to this. My second one could be so... Oh yeah only ever doing one.


Looks OK, I think.

Wednesday 26 June 2013

Buttoned Up

Got a call from Roger. 11 days from now is the first and likely only dirt track race in our area. Afraid we're not going to make it. Probably best anyways, never ridden on a dirt track before:). I am stoked about getting this thing out there though. We'll post some video if I can get it sideways later. Hopefully we can keep it uprightish. Roger got his little Yamaha done. I don't have any good pictures, but I got one with my cell.


...back to the XS.
So some more progress.
Bottom end is mostly together.

Bought the 750 kit from Gary Hoos a few months back. Didn't bother sending him my cylinder as he had a '71 sitting on his bench. The only difference I could find was the four bolt tensioner vs. the six bolt on my "72, so I went ahead and bought it from him.

I welded a couple of lugs on to the tensioner mount so I could use all six bolts on my tensioner. I assume Yamaha did this change for a reason. Anyways now my '71 cylinder accepts my six bolt tensioner.


Got the cylinders on, then realized I forgot the o-rings for around the sleeve bottoms. So took it all apart and added the o-rings. It was then I realized when they bore the casting for the bigger sleeves, they don't bother with the o-ring grooves. So after some research... seems nobody bothers with them on the big bores, so off they came and the cylinder went back on. That was a waste of an hour or two.


New electricity maker installed. This is a nice piece. Don't hesitate to send $300.00 to TC Choppers, it's good stuff.


Don't like the kickstarter action so much. Has to rotate 70 -80 degrees before engaging. Have to open that back up and see if we can resolve this issue. Seems that most of them are like this. 

Took out about 20 lbs. of shafts, gears and starter motor. We'll be kick only. Just as any good race bike should be. Have to figure out a good seal solution for the gaping hole where the starter used to reside. I'll get one of them nice lithium battery's from Ballistic, they're tiny little things. 

Have to decide if we're going to put the stock decompression unit back in. The '72 has the cool little lever under the throttle, but of course this is gone with the modern throttle tube assembly. Have to figure that one out as well.